A task-focused landing (TFL) page is a custom La Trobe University landing page. This is most common for microsite landing pages, to direct users to important parts of your site.
A TFL is modular with common features including landing features (large content boxes), content boxes (with or without images) and news or event listings. Editors can update a TFL, but the process differs from standard editing principles.
TFL widgets
TFLs are divided into sections, called widgets. Edits on a widget won’t affect the surrounding content. The following widgets are available on TFLs:
- landing feature A
- landing feature B
- content boxes with image
- content boxes without image
- YouTube video embed
- news listing
- events listing
- Social media icons.
Editing a TFL
Prior to editing a TFL ensure you are logged into the CMS. Enter /_login at the end of the URL and enter your details.
- Once you’re logged in, enter /_nocache at the end of the page URL. An ‘edit’ button will display on the top right of the page.
- select edit, the page will refresh
- a hover animation will appear as your cursor moves over sections
- click the desired module or content box to edit
- an editing panel will appear on the left, displaying all editable fields. Please note content fields have character limits.
- to update a CTA link insert the full URL. The CMS will automatically update this to an asset id.
- click save
- once you have completed editing the page, click publish
- clear the cache using the clearcache tool
 Update an image
- navigate to the TFL editing screen using, /_nocache.
- click ‘edit’ on the top right of your screen
- select the module with the image you would like to change
- select ‘Replace image in Easy Edit’, this will redirect to the standard easy edit screen used to upload/ update images
- ensure the replacement image is of the same dimension. Note: Landing feature A requires image dimensions of 2560 x 1440 pixels.
- once saved, clear the cache of the image as well as the TFL using the clearcache tool
 Creating new/ changing widgets through the widget library
- navigate to the TFL editing screen using /_nocache
- click ‘edit’ on the top right of your screen
- select the module to update.
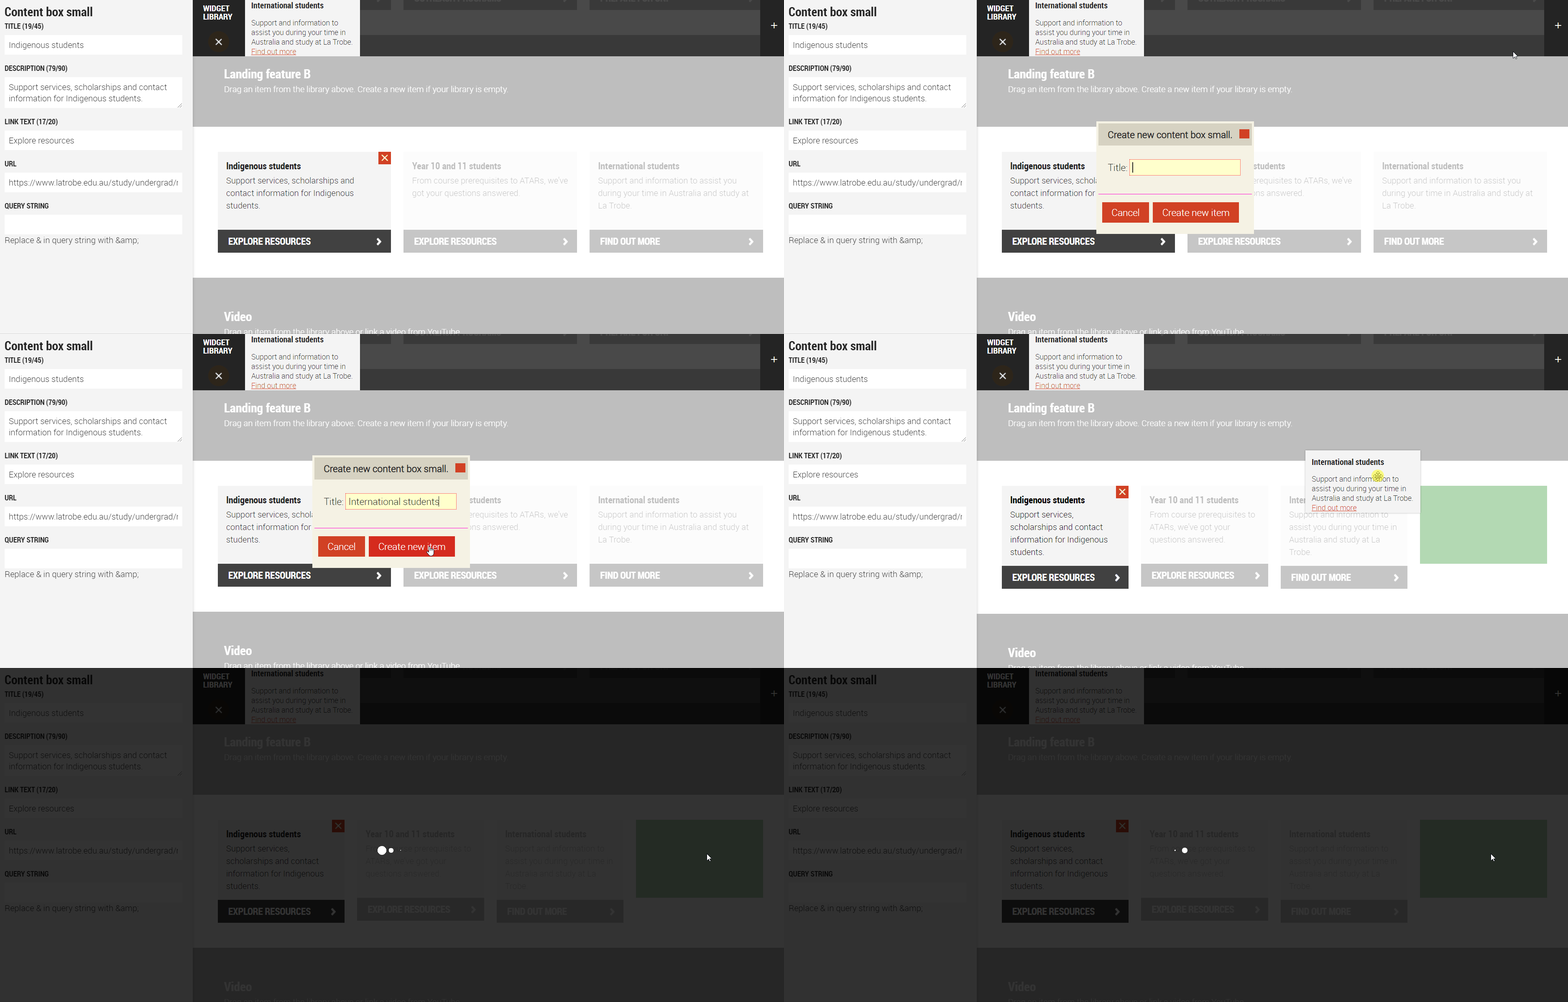
- a widget library will appear at the top your page. This displays previously used widgets allowing you to drag and drop the widget onto the page.
- select the + button, a pop up will appear
- enter a title and image (if required)
- the created widget will appear in the widget library
- click and drag the widget onto the page. A green box will appear identify where your box will display
- click save, once you have completed updating your widget.
- select publish
- clear the cache using the clearcache tool

Remove a widget
- navigate to the TFL editing screen using /_nocache
- click edit on the top right of your screen
- select the module to update
- select the red (X) to remove the widget from your page. Note: a minimum of 2 content boxes are required for the widget to appear.
- once you have completed editing the page, click publish
- clear the cache using the clearcache tool.
Need help?
If you have any questions during your editing process, please submit a request through the Digital Marketing Request System.
Have questions about your web editing?
Remember, we’re always here to help! To reach out, please:


0 Comments
1 Pingback